Showing posts with label gardening. Show all posts

Wednesday, May 15, 2013

Conclusion

Every story must have an ending, and so I will write an appropriate goodbye.

It has been a year since I began our worm composting experiment (did you think I was saying goodbye to the blog? No such luck, people! Your suffering will continue I'm afraid). It was a success in some respects, but a failure in others. I will write a list of pros and cons in case anyone wants to try it.

Pros:

1) Worm poop makes gardens grow (I have to assume this is true, as I only planted my garden this week and nothing is growing yet, but the Internet says that worm poop makes gardens grow and the Internet is always right, right?)
2) Worms make great pets. They are quiet, they eat your garbage (although to be fair, there are plenty of dogs that eat garbage, right Theressa?) and they require very little attention. Plus, there is the alleged excreta benefit mentioned above.
3) Worms make you feel like you are doing a great thing for the environment. This must also mean that I can crank up my a/c to offset my green footprint, or something like that, I forget. I'll ask Chey tomorrow. She's been learning all about the environment at school and "teaching" (teaching = lecturing in a self-righteous manner) me how to be greener at home "to save the earth." Worm composting is also great for bragging about my wonderful environment-saving skills, people really look at me with admiration in their eyes when I start talking about my worms. I could be reading them wrong though. It could be the glazed looks of people who wish they were on a quiet sandy beach somewhere. No, I'm pretty sure it's admiration or adoration or approbation or aversion.
4) You can compost in the winter with worms.

Cons:

1) Although worms make great pets from an ease-of-care standpoint, they do not make good pets from a mental health standpoint. They tend to disappear when you open up their box to observe them. I choose to believe that this sudden dive is due to their intense need to escape the light and not an attempt to avoid being cuddled, which brings me to my second pet-con. Worms are rather slimy and not at all nice to cuddle with.
2)Worms need to be fed, but not too much. They're actually, kind of picky, little bastards. They prefer their food to be cut up into small bits (its garbage, I don't cut my kids' food for them, I'm certainly NOT cutting up garbage for worm food) and they only eat about half of what our family produces in a week, as far as vegetative waste. They also like cardboard and newsprint, nether of which we seem to have when required (darn recycle bins!)
3)Worms (actually, it's probably the decomposing food, but I'm not fact checking tonight) produce a lot of liquid called leachate. Turns out this is kind of toxic and is not the same thing as worm tea (to get worm tea you soak their poop in water. You do not soak the worms in water. Also, the "tea" part is misleading. It is NOT the latest superfood (yet, maybe no one has thought of it. Does this mean that when someone does think of it, that they are stealing MY idea? Mark your calendars, people, I might need additional evidence of my genius) so I wouldn't recommend drinking it, unless it turns out to be a superfood, then fly at it!). You can not feed leachate to your house plants and expect them to live. You can use it to kill your house plants, though, so if that's what you're going for, this could be a pro. The other problem with leachate is that it has to be emptied (about once per month) because there is a lot of it and it starts to make your house smell funky (not the good kind) after a while. In the winter, this poses a slight problem, solved by the toilet, but not without mess and aggravation, a little cursing and an extra load of laundry.
4) Worm composers take up space. Ok, I'm stretching with this one, but it is true. You need a dark space that is convenient to get to and not too cold or hot (see? picky bastards!), I used our front hall closet, but that space is now being used for something else (which I shall share soon), I'm not sure where they would go, should I choose to use worms again.

Conclusions: I did like having the worm composter, but ultimately found out that it wasn't for me. If the worms had been able to handle the amount of vegetative waste our family produces, I might feel differently, but I found the cons to outweigh the pros.... Now, If my garden suddenly produces something phenomenal, the pros might still win. I'll keep you posted.

Here is the bin just before I dumped it, worms and all, into my garden.


My garden helper... notice the skirt.
She's actually wearing one, not to worry though.... those are sharks you see.

Tuesday, September 25, 2012

One project down.

As I've mentioned in several posts, Dale and I (mostly I, but he does help when he's not working) are slowly giving our house a teeny facelift. Mainly paint and decorating, but I'm hoping, that over the next year, we will have the house refreshed and better organized.

With that goal in mind, one of the problems/DIY project on our list,  has been to figure out garden storage. We have a small, lean-to, style shed against the side of the house that plays the part of "catch all" for our gardening detritus. Lawnmower, wheelbarrow, shovels, rakes, bags of soil, buckets, small garden tools, fertilizer, hose pieces, etc. are all piled in the little shed and most of it has to be removed each time the lawn needs to be mowed. I thought that a nice dresser or small hutch, painted as a part of the backyard decor, might be a partial solution. At least we would get the little bits out of the shed......

I trolled Kijiji for about a month, looking for something cheap (like under $50 cheap), but solid and didn't really find what I was looking for (it had to fit in a certain spot against the house). One day I drove past a garage sale and found the perfect dresser... for $20. The gentleman selling it, said it was solid wood and it was hard to tell because he had painted it with some kind of super thick plastic deck paint, but I thought we'd give it a go.

I forgot to take a good picture of the before, this will have to do.


It sat in the garage all summer, until it finally rose to the top of the "honey do" list and Dale started the stripping process. He found out pretty quickly that it was NOT solid, but some kind of laminate over pine. The laminate didn't make it through the stripping process (nor did the drawer bottoms or bottom of the cabinet, but I'll fix that in the spring) and it turned out to be a much larger, more expensive job than I had anticipated. I was finally able to start staining on the weekend. My plan was to stain the body of the dresser one colour and all of the drawer fronts and doors different colours. I think it turned out looking fabulous, but the cost and effort of the redo, relative to the  quality of the initial (and ending) piece of furniture was not worth it. I think we'll have paid over $200 in stripper, stain, varnish, new drawer bases and pulls which would have been worth it had the dresser been of better quality.  Something for me to think about in the future, that is for certain.

Here it is after being stripped. Again, I need to learn to take better pictures, but you can see the inside, bottom of the cabinet is trashed. All of the drawers are the same.


It does look pretty though. The cabinet itself is stained dark red, the largest door was stained purple, but it looks dark brown, which is unfortunate. I LOVE the teal/turquoise doors! In retrospect, I wish I had stained the entire cabinet with that stain..... I couldn't wait to show you, even though I have yet to put on handles and pulls and fix the drawers. I don't plan to do that until Spring though.


I can totally picture it with a flower pot on the top. What do you think?


Tuesday, June 19, 2012

I know you want to see the finished product

Man! Have I been in a funk lately! Not sure if I had a touch of something or just localized blech, but I woke up on Saturday to a much cheerier disposition (although Dale might dispute this) and we finally finished our front garden (maybe 98% finished, I still have some plants to plant and a few decorative items to buy and place, but mostly... it's done!). I looks so pretty that I thought I should show it off.... I did a post about the "before" and "mid-way" portions a month or so ago, but here is a before shot if you're too lazy (as I would be) to go back and check.


And now....


I think it's much better and as time goes and things grow it will look even nicer....

Here are some close ups of the rock garden (or smurf/fairy garden as my neighbour's daughter calls it)


Eventually there will be moss and creeping thyme between all of the pavers

Isn't this pretty?


We also made our own stepping stone out of concrete when Dale expanded the Driveway.... I wanted to draw in the expansion, but how do you take that with you??

And here are a few pictures of the backyard. Lots of planters


Gladiolas, my first time growing these...


The garden box.... it's looked exactly like this for a month.... We need some SUN!


One of the two tomato plants that I started in the house in January... It's HUGE!


And the main garden bed... which gets prettier every year...


I also made a new birdbath. I used a glass plate that I had made several years ago when I experimented with glass fusion. The plate is really pretty, but not very functional. I used a bit of chain and a hanging basket holder... it's perfect!


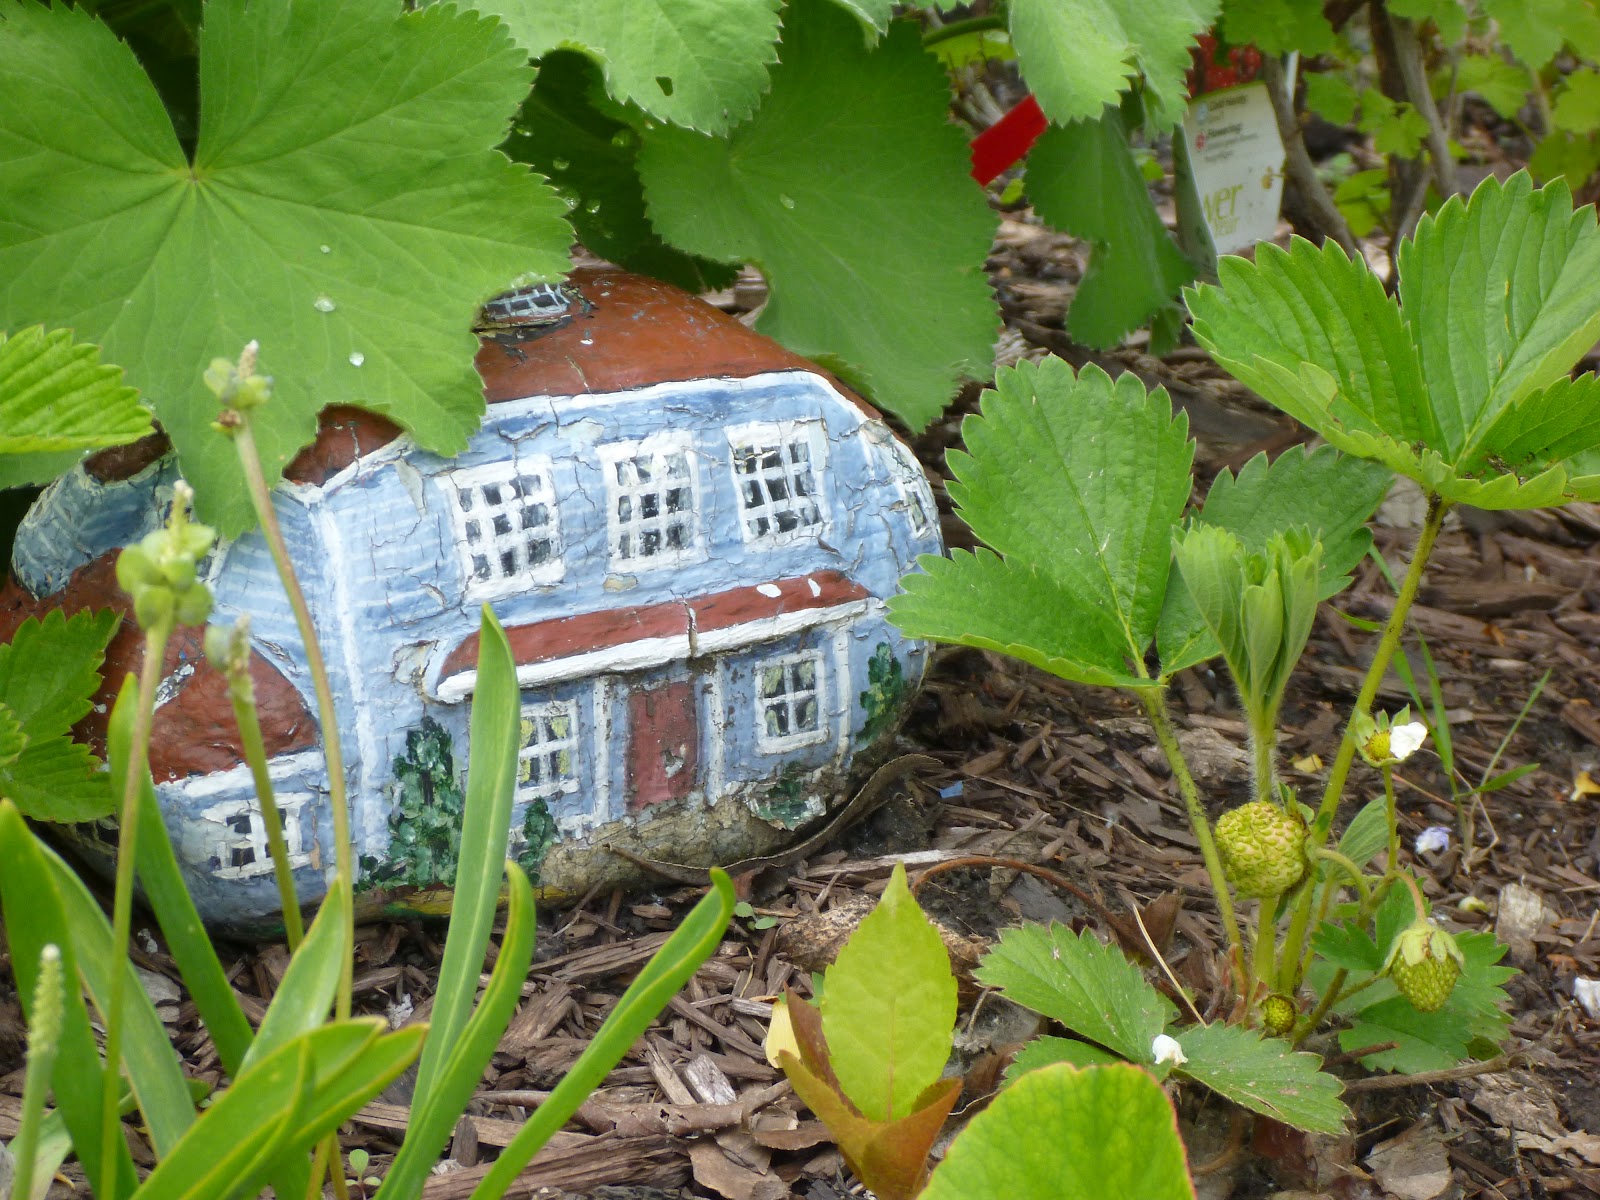
My MIL paints rocks to look like flowers and houses... They look fantastic in the garden, tucked under plants like little fairy houses....


Thursday, May 10, 2012

Worms

It's been about six weeks since I started our Vermicomposting project and I think it's coming along nicely. The worms are eating most of our vegetative waste and can consume approximately 7 litres (2 gallons) per week. I'm hoping that will increase a bit more as the worms reproduce, but, overall,  I'm happy with the results. I've learned that my worms don't really like bread products, so I no longer include them. They also prefer their meals to be cut up, but I am far too lazy to cut up all of our waste into itty-bitty bits for the worms... I've got picky kids and I'm not catering to worms... they can chew an apple core whole, thank you very much.

The hardest part of the whole process is the retraining of the male parental unit of the household. The miniature humans mostly remember about the compost bucket, but the MPU is still rather unlikely to contribute to our effort. He's probably not doing it to tick me off though.... probably.


Other than that... Vermicomposting seems to be an easy way to compost year round in Calgary.

Tuesday, May 8, 2012

Ouch, my aching back....

We've been going crazy around her the past few days (actually, Dale has done very little after the initial removal of the sod... work and all that) starting a new landscaping project. Our plan is to remove ALL of the lawn in the front yard and replace it with a rock garden. We are also extending our driveway by about 30inches because apparently I don't know how to share either the garage OR the driveway, causing Dale to park partially on the lawn,,,, which has been disastrous for that section of lawn. Our plan is to tackle the project in 3 stages. Stage I: the first half of the rock garden; Stage II: extending the driveway and next year, Stage III: the second half of the rock garden.
Before... not too bad, but not great either


You can really see the horrid condition of the lawn here


We started off by renting a sod remover thingamajig (no idea of the technical term, but "wondrous, spectacular remover of sod" comes to mind) which Dale put to good use on Friday after work. He removed most of the lawn that we had marked out and left a little for the next morning..... when it decided to snow.... Not to be deterred, he completed his task in the snow and voila! his job was complete (I'm not helping with the concrete, no.I.am.not).


My job then began. I had to clear all of the sod off the new garden area and remove the brick from the small raised bed in front of the house. My next step was to dig out and transplant a spirea shrub and three tea roses (those suckers are SHARP) all while defending myself from the very angry ants who seemed to be very pissed off (I had a gentler word there, but the harsher profanity seemed to fit the situation better) that I would ruin their home so cavalierly. I then had to fork and turn all of the exposed concrete in the new bed (I'm pretty sure it's dirt or at least clay, but it felt a LOT like concrete), I then added some zeolite and topsoil mix and forked it again. Then I had to break up the bits with a rake and level everything out. I ran to Burnco for some paving stones (I only brought home a few in the van... those suckers are HE-AVY and my poor van wasn't happy) and dug them into the prepared dirt base. My final step of the day was the addition of the purdy-ness.... and I am done.... Well, sort of done.... I have to finish the paving stones and add the gravel/rock part of the rock garden, but I wanted to show you the semi-finished product as the rest is going to have to wait until my back stops hurting.....


The kids helped me lay out the plants 


It'll be REALLY pretty in two years when the perennials grow in.


The pavers will wrap around to the side of the house, next week.

Thursday, May 3, 2012

Two Loves

Sheep or gardening... sometimes I don't have to choose....


This super awesome sheep planter was purchased at London Drugs for $29.95 (it was on sale from $49.95, I think)..... Fibre lovers better run and grab the rest before they are gone......