Friday, March 30, 2012

A new tradition

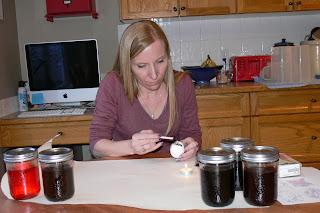
Want to keep kid interested in a craft project??? Find a craft that involves fire, melted wax, permanent dye and blowing stuff that looks like snot into a bowl.... AKA Pysanky or Ukrainian Easter Eggs.

This is a craft that I've always wanted to learn and I finally decided to find out how. After doing my typical google research, I discovered an Art Supply place in Calgary that sells the "authentic" Pysanky supplies and made a trip downtown to load up. Pysanky is relatively cheap. The Kistkas (the styluses used to draw) are a couple of dollars each as are the dyes. You can use any kind of beeswax (paraffin wax is not a good idea) and a candle.... that is really all you need. I bought a deluxe kit that included everything (I bought an extra Kistka and a tool for helping to blow out eggs) for around $50 (you could easily choose a couple of dyes and Kistka for much less. We have our favourite colours and have only used maybe six of the 11 dyes). Once the dyes are made up in mason jars (which I had to buy as well), they last for quite a while (I think I read several dozen eggs or a couple of years).

Traditional Pysanky uses raw eggs that are left whole and will eventually dry out. I, however, envisioned an egg getting knocked off it's display or exploding in storage and the resulting smell of decay and the disgusting clean up that would be required and decided to be less traditional. We would blow out the eggs' guts. You can blow first and ask questions later (as the egg contents are inedible if blown out after the dye process; the dyes are not food safe and some of the chemicals will soak into the egg) or design first and blow later. The biggest disadvantage to blowing first is that it is hard to hold the eggs down in the dye and there are white spots left where the holes are punctured (they are covered in wax so that dye doesn't get inside the egg and ruin the egg and/or the other dye baths). I decided we would blow first. And who best to blow... the people with the most air (it was silent for a whole 5 minutes during this process)


The process of Pysanky is simple. I found a fabulous website that I more or less followed (we didn't do the vinegar or orange bath).

1) We drew our designs on paper and coloured them with crayon so that we knew which order to cover and dye (some of us were faster and went straight back to the important job of finishing a level on our DS).


2) Draw your design in pencil on the egg (we found that it is easier to do lots of geometric line designs with fewer areas to fill in. My original thought was that larger designs that would be filled in would be easier for the kids, not so).

3) You then prepare your kistka, by holding in the flame for about 10 seconds and scooping wax off the sheet into the funnel (I did the scooping, I was worried about slippage and blistered fingers). The kistka is then reheated and the melted wax is used to draw.

4) To start your egg, you cover all the areas that you want left white with wax and dip into the lightest dye that your design has (yellow or orange).


5) After the egg is dyed and patted dry, you draw over the areas that you want to preserve as the colour of your first dip.

6) You then dip into the second colour (progressively darker with black being last) and repeat the process all over again. Most websites recommend only using 2-3 dips and we didn't experiment beyond the recommendation and in fact, I preferred the look of only 2 dips.


7) Once the design is complete it looks .... well, like crap. The egg is covered in wax which then needs to be removed. I decided to use the hairdryer method which worked really well, but you have to be careful not to overheat the egg or it explodes..... ask me how I know. You heat sections of the egg and carefully wipe off the melted wax, revealing your creation.
Chey drew a Mososaurus (T-Rex of the Sea) on her egg.... I'm fairly certain that is NOT a traditional Ukrainian design

My second attempt (the one that exploded...... although it did hold together due to the inner egg membrane  and I think the varnish will keep it whole)

After wax removal

8) Varnish and display and you're done.

These are shot glasses that I thought worked perfected to display the eggs. 

This was my first attempt. I learned that large scale drawings are hard to cover completely... It's supposed to be a dolphin

All lined up (Eli still has to finish his)

This was my third and best attempt. I used mainly lines and only choose two colours. It is really quite pretty.
I now have a "kit" set up in the form of a plastic bin with the filled jars, some place mats (instead of wasting paper and for better absorbency), a plastic mat (for dyeing on) and the rest of the supplies.... It should be easy to pull out at any time.

You should try it!

Wednesday, March 28, 2012

Mesh Panel Tee: New Pattern

The weather finally cooperated enough for some pictures of my newest design so I packed up the kids and we went to a rock monument so that you couldn't see how brown it is here right now...... My photographer was Eli. He's pretty good, if I do say so myself......  Introducing:

The pattern for "Mesh Panel Tee" (I know, I am SO not original with my names)


Knit with two strands of Madelinetosh Tosh Lace held together, this top was knit from the top down using the contiguous method developed by SusieM. This method allows the knitter to knit a top down, seamless sweater with set-in sleeves.

I hope you like it..... there will be a child's version coming soon.

Tuesday, March 27, 2012

DIY: Adjustable waist

Eli is small. OK....... that may be a slight exaggeration, sort of like saying an elephant is big. Eli is tiny. He is 10.5 years old and is about the size of a very slight eight year old. This causes me nothing but problems when I go shopping for pants (don't get me started on swim suits and shorts!) because most clothing manufacturers make their clothing for average sized kids and "average" is getting larger all the time. Some manufacturers do make adjustable waist jeans, but that seems to fade out of usage in the size 10 & up range....... Yes, I can buy the super-skinny type jeans (which are still way too big), but how many pairs of skinny jeans does a kid need??? And non-skinny legged jeans are difficult to find in a slim fit that is actually slim enough that the waist doesn't bunch and create it's own fanny pack in the back of the pant. So, once I find a brand that isn't terrible, I buy it. Unfortunately,  they all require belts and Eli hates belts...... which is why I decided to try to make my own adjustable waist for him. This only really works if you only need to take in 2-3 inches of the waist... more than that and I think you'd need to alter the waist first. The jeans in the photo below were altered originally, by removing the waist band and putting pleats along the inside of the front pockets (I removed about 3-4 inches of waist that way and left a couple of inches just-in-case). Also, I should mention that I am not much of a seamstress which means anyone can do this.....

Here are 2 of the 4 pairs that I added waistbands to. I'm thrilled about this because swimsuits don't usually adjust AT ALL and he ends up wearing a size 4 or 5 so they stay up (which look ridiculous because they are too short).


First I measured between the two side belt loops. 


Then I cut a length of soft flannel with a slight seam allowance and 2 and a bit inches of depth. Enough for a seam allowance on top and bottom and enough so the bottom part could be sewn right below the waistband of the jeans. I then sewed the two ends down. 


Next, I pinned the flannel with the flannel right side to the inside top of the waistband and sewed through along the top seam of the waist band from the outside. I found I had better control of the pant this way, than if I had sewn the flannel side up. I carefully "walked" my sewing machine over the belt loops along the seam that was already there (I skipped the bottom belt loops or they would have been half the depth). 


 Once that was complete, I ironed the flannel down and folded the bottom hem of the flannel under (and ironed it) so that it would be sewn as close to the bottom of the waistband (but not on the waistband) as possible. I also sewed this portion from the outside of the pants (once it was pinned down) and skipped over any belt loops (you could removed the belt loops and sew them back down, but I thought a quick hand seam where I skipped would be faster).


 I tried to either partially remove and then restitch the back "brand patch" or like these, follow the existing stitch line (not well).


Here is the hole from skipping the belt loops, this I just hand stitched closed....


I then sewed in a pair of buttons and threaded some maternity elastic that I found at Walmart for under $2.....


Voila! Adjustable waist pants that actually get worn......


Friday, March 23, 2012

We've got worms.


In a good way....

I was inspired by Pinterest to try vermicomposting. I've always disliked the amount of food waste that our family produces and was hoping that the City of Calgary would introduce composting several years ago.  There was a public outcry about the cost (they were going to do recycling, garbage and composting in one go) and the City decided to scrap the plan and introduce each new initiative separately (side note about the cost... we pay more for just recycling and garbage now than the proposed cost of all three when the plan was introduced.... interesting).The city has introduced a compost pilot project in a few neighbourhoods, but if it does get approved, it will be several more years until it comes to our neighbourhood so I had to figure something else out.  I originally had planned to start an outdoor compost, but the space, bugs and smell dissuaded me from taking the plunge. Which is why I latched onto the idea of vermicomposting. After reading about it here (and several other places) I decided to give it a go.....

I resolved to make my own composting system and settled on a two layer system. With this system, once the first bin is full, you put the second bin on top and start feeding up there, the worms eventually migrate into the new bin leaving mostly worm free casings (i.e.: worm poop) in the bottom bin, ready to be added to the garden. This system should allow me to not have to sort worms from their compost, but we shall see......

I bought three 53 litre  plastic Rubbermaid "Roughneck" bins (two for the worms, one for the excess moisture).


I then drilled big holes (didn't check the drill size) in the bottom of two of the bins (for drainage and migration)


Using a smaller drill bit, I drilled air holes around the bin and in one of the lids (the other two lids will hit the recycling bin).

Chey and I shredded a bunch of newspaper and soaked it in water and squeezed out the excess (the paper should be the dampness of a wrung out sponge).


We put that in the bottom of the bin and then put some "compost material" (fruits, veggies, bread.... NO animal protein or oil!).

I then layered some wet cardboard on top and let the whole thing sit for several days (worms like their food "matured").


Today we added the worms (we found a worm farm in Calgary, Worms @ Work).....


Let the experiment begin!


Tuesday, March 20, 2012

Fully Operational

The Charkha is ready and I've been learning to spin cotton on it. I thought I'd share the process in a little video.  I filmed it myself using a tripod, hence the lack of zoom and zip. If you'd like a better video at some point where you can actually SEE the process, just let me know. I'll see what I can do.  Even without good closeups and contrast the video gives you a vague idea of how a charkha works...... or at least how a charkha works in the hands of someone who has spun on it for a whole hour......

Thanks for watching!!

Sunday, March 18, 2012

Ch...ch...ch...ch.changes....

I know I'm not unique or original, so when the title for this blog post popped into my head, I had to Google it (along with the word blog) to see how many people have used that title..... Turns out, it was exactly as I thought.... TONS.... I quickly scanned through the first 10 pages of blogs with "Ch...ch...ch...changes" as the post title before I realized that I could never use it..... However,  I couldn't get it out of my head, so I've decided to use it ironically.

In the quest to post more frequently, I'm going to try moving my blog in a different, albeit similar direction. Think of it as SAHM Knits 2.0 Beta (because I'm not sure yet). The same amount of knitting and spinning interspersed with some daily life, but with the addition of other things.  For example: I made Eli some adjustable waist pants today (I didn't make the pants, just the adjustable part) and rather than sew, clean and be done... I photographed the process and I will do a blog about it this week (not tonight, it's getting late).... and I never did show off the indoor garden we have growing in the basement (yes, it's the kind I CAN show off.... sheesh people! I have children!).

I will admit that this slight change in direction may be influenced by Pinterest, an online pin board chock FULL of inspiration for craft projects, home projects, cooking, reading, art, music, style, makeup, hair... you name it, it's on there. I decided to learn how to do French Tips on my nails after seeing a cool nail picture that someone else had pinned. I've found websites that are great inspiration for braiding and styling Chey's hair (she is not impressed by this for some reason, perhaps if I let her watch slasher Dinosaur Documentaries while I do it, she'll be happier? She is quite thrilled that I learned to colour her hair green with pastels for the day so there is hope for her yet in the girlie department). Someone pinned an indoor Vermicomposting product, so naturally I had to find out how that worked... Can you guess what an upcoming blog post might be about???  Not all of my new flashes of creative brilliance are fanned in  Pinterest, but they are most definitely sparked there...


and you get to read all about it.....

Wednesday, March 7, 2012

I said "Charkha", not "Chakra"

I think I might be saying that a lot in the next little while.....  People's eyes already get that unfocused, confused look when I mention I spin "like Sleeping Beauty, not on a bike"....adding the words "Charkha, not Chakra" will probably not help with my cool, hip,  sexy momma image... Sigh... that was probably always a lost cause...

On with my story...... Dale has a very nice man working for him (people that get me presents are always very nice, just saying'... *wink, wink*) who was heading home to India in December and asked Dale if he would like anything. Dale told me about the offer and, being the fibre-obsessed, weirdo that I am, I immediately said that I would love an Indian built table-top Charkha. There was only one teensy-weensy problem... I wanted a decorative Charkha.

Firstly, I should probably explain what, exactly, a Charkha is (and what a chakra is to, I suppose. Although I'll just link that one to Wikipedia.... here). A Charkha is a type of spinning wheel, used mainly in parts of Asia to spin fine, short stapled fibres like cotton (or cashmere, or even silk which needs a higher twist ). It is similar to a Great Wheel in that the drive wheel is spun by hand and the fibre is spun onto a spindle (unlike a treadle wheel where the wheel is turned with the foot treadles leaving the hands free to draft the fibre which is then spun onto a bobbin using the flyer assembly). Ghandi used the Charkha as a symbol of the Indian Independence movement in the early half of the Twentieth century as part of his non-violent, non-cooperation, peaceful resistance against the British. His argument was that Indian should be able to spin their own cotton, rather than shipping the cotton to the UK and then have the resulting cloth sent back to India where prices were too high for most Indians to afford. This would also allow Indians to boycott foreign cloth and support their own economy (the Independence Movement was obviously about more than spinning cotton, but I am only sharing a very simplified version as it relates to my story). He would often sit and spin cotton on his charkha and bid that other Indians do the same. He even invented the book (or briefcase) style charkha so that spinning could be more portable. And I wanted one.... First of all, I love the story of Ghandi. He's a very interesting man. I read his autobiography years ago and parts of it have always stuck with me. Secondly, I love stuff that comes from somewhere. Stuff that has a story and is different from the things that I can buy in the stores here. I could easily buy a briefcase Charkha locally (that is made in India and shipped to the vendor), but I wanted a Charkha with a story and I wanted it to become a part of my furniture and home. Which leads me to my problem of requesting a decorative Charkha.....

Charkhas are tools and the people that still use Charkhas in India use them as such. Many of them need to spin their own cotton in order to clothe their families. Spinning is not a hobby like it is for me, it is a necessity and to have a decorative Charkha would be a  waste of resources. I knew this when I asked, but I thought that maybe, just maybe Sandeep would understand what I was looking for and if it was not inconvenient, find it for me (I did stress not to go out of his way or to make it a big deal... I would be happy with a new Charkha or not.... either way was good with me). Sandeep asked me for some pictures and I found two pictures online that were examples of what I was hoping for. One of the pictures happened to be from a store that was only a block or two away from his home in India (which I want to say is in Mumbai, but it could be New Delhi).... Kismet, I think so....

Here is the picture I gave him


And here is what arrived today....... I was worried about putting it together, but it was very simple to do.


It is completely handmade and has that wonderful look and feel of something made in another country by hand. It is, unfortunately, missing the spindle and spindle supports, but I'm pretty sure I can find those locally or have them made.... regardless of whether I can use it to spin today or not (not, as it turns out), it is beautiful and I am eternally thankful to Sandeep for bringing it home to me.


Thank you Sandeep.


Thursday, March 1, 2012

Newest....

I thought I'd do a quick post to share my latest spinning/knitting project. I first mentioned the spinning in January. One of the Ravelry groups I belong to had a Sadie Hawkins Day challenge. The challenge was to spin something from your stash that scares you by February 29th. Being me, I decided to take the challenge a step further and not only spin for the challenge, but also complete the knitted garment, all by February 29th. The spinning itself was a bit challenging because the silk and cashmere didn't want to play well together. I ended up with portions of pure cashmere (the brown) and pure silk (the white). I had hoped to avoid this by spinning from the fold, but the fibre ultimately decided the yarn it wanted to be and in the end, I let it....... The resulting yarn is a heavy lace/light fingering and I ended up with over 1100m, more than plenty for a long, flow-y cardigan.


My plan for the cardigan was to try a new method of knitting from the top down developed by Susie Myers called the "contiguous" method. This method is used to knit a top-down sweater with set in sleeves in ONE PIECE! It worked really well and will be added to my" favourite ways to knit sweaters" category.

Here it is.... I finished it last night (met my goal! Yay!) I haven't sewn in the ends of the sleeves yet because I can't decide if I want to make them a bit longer. They were intended to be 3/4 length, but because the cardigan is so loose, they hang down to bracelet length. Also, I may end up shortening the cardigan a bit... I can't decide. What do you think?? Do you like it??